How to set up Pre-Arrival Email Forms in Shortcuts Cloud
Learn how to request and view information from clients before their appointment with Pre-Arrival Email Forms.
You can now send Pre-Arrival Email Forms to clients! These forms will automatically send to clients via your Appointment Acknowledgement email based on rules that you set within Cloud.
You will need:
- Shortcuts Fusion with Cloud (available on select Shortcuts Packages)
- If you are not sure if Cloud is included in your package please contact our support team.
- If you are not sure how to access Cloud, visit pos.shortcutssoftware.com then use the same login details that you use to log in to your Online Console. To setup access to cloud for your staff, follow the steps in this video.
How to setup Pre-arrival forms
There are 3 main steps to setting up Pre Arrival Email Forms:
- Setup Online Forms
- Setup rules around when the form should be sent
- Setup Appointment Acknowledgement emails
1. Setup Online Forms
- Please refer to this article to learn how to setup online forms. If you don't have access to create client forms, please contact our Support team.
2. Setup Rules around when forms should be sent
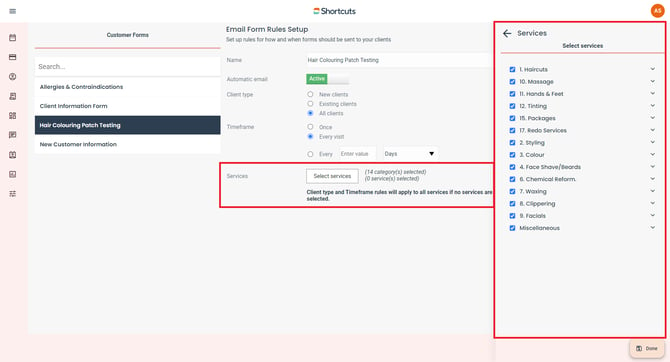
1. Open the Menu, select ‘Business settings’, then select ‘Customer Forms’.
Click to enlarge.
- If a client is new, returning or if the form should go to all clients
- Timeframe (Once, Every visit or Every X Days/Weeks/Months)
- Services this form applies to
NOTE: Once you have completed your selections, ensure you click "Done" and then click "Save"

3. Setup/add your online form to the Appointment Acknowledgement email
NOTE: You can watch a video on how to set up this step here:
- Open Menu, select ‘Messages’, select ‘Appointment Acknowledgement’.
- Select the ‘Email’ option.
- By default, emails are setup with standard text and recommended settings. You can can add your own logo, and update any settings and wording to be more in line with your brand.
- If you have previously activated this message, you will need to deactivate before moving onto the next step.
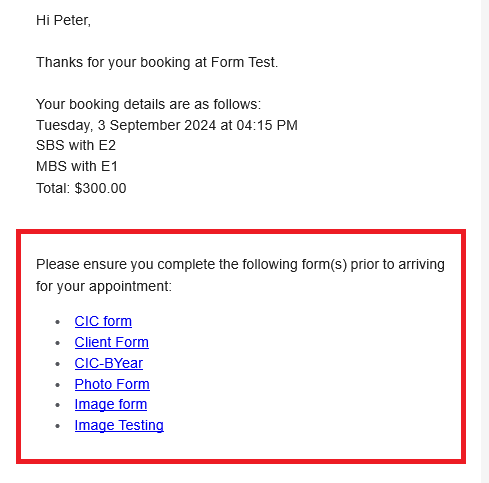
- To include online forms in this email, scroll down to the section that says ‘Forms’ and click ‘Add link to forms’.

Check for completed forms - available in Cloud Appointment Book only
NOTE: You can watch a video about the information in this step here:
- Click on a customer’s upcoming appointment.
- This will bring up the touch-tip with a list of forms that have been sent to a customer. Please note, all forms previously sent to the customer will be listed here. Not just the forms applicable to this appointment.
- If a customer hasn’t completed the relevant form(s), the appointment will appear as yellow and the touch-tip will display a red cross beside it.
- If a customer has completed the relevant form(s), the touch-tip will display a green tick beside it and the appointment will turn green.
How to view forms for an appointment
NOTE: You can watch a video about the information in this step here:
A quick way to view forms for upcoming appointments is to tap on the appointment to access the Touch Tip, then click on a form with a green tick next to it.

How to view any forms that have been completed
NOTE: You can watch a video about the information in this step here:
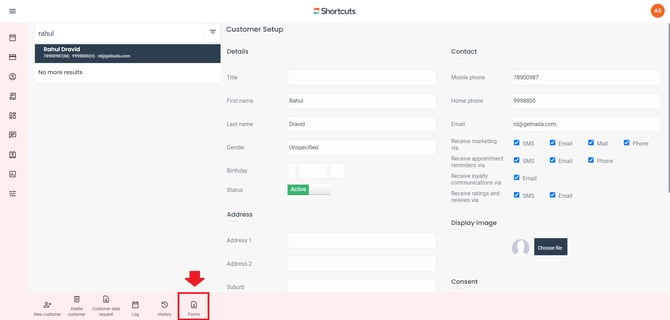
- Open the Menu, select ‘Customers’ and select the client you would like to see the details for.
- Select the ‘Forms’ button at the bottom.

How to check or change which employees can access Pre-Arrival Forms
- Open the Menu, select ‘Business settings’, then ‘Roles and permissions’.
- By default, employees with the ‘Site Manager’ role can configure customer forms and can view form history.
Frequently Asked Questions
Question: What will happen if I change an appointment?
Answer: If you have only changed the time of an existing appointment, then any incomplete forms at the time of re-scheduling will be re-sent. If any new services that require other forms are added to an appointment, these new forms will also be sent to the client.
Question: What will happen if I delete and re-make an appointment?
Answer: It’s a new appointment as far as form sending rules are concerned. Any forms required to be completed by the client based on your forms rules will be sent out again with the new Appointment Acknowledgement Email the new appointment will trigger.
%20(1300%20x%20200%20px).png?width=450&height=69&name=Short%20Haircut%20Photo%20Banner%20Email%20Header%20(1300%20x%20300%20px)%20(1300%20x%20200%20px).png)


