%20(1300%20x%20200%20px).png?width=450&height=69&name=Short%20Haircut%20Photo%20Banner%20Email%20Header%20(1300%20x%20300%20px)%20(1300%20x%20200%20px).png)
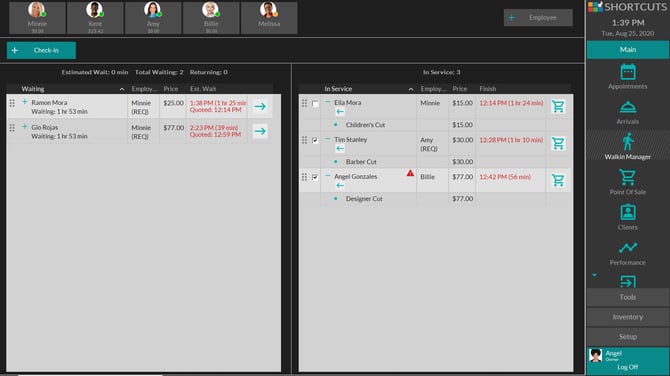
The Walkin Manager has been updated for a more efficient and intuitive user experience.
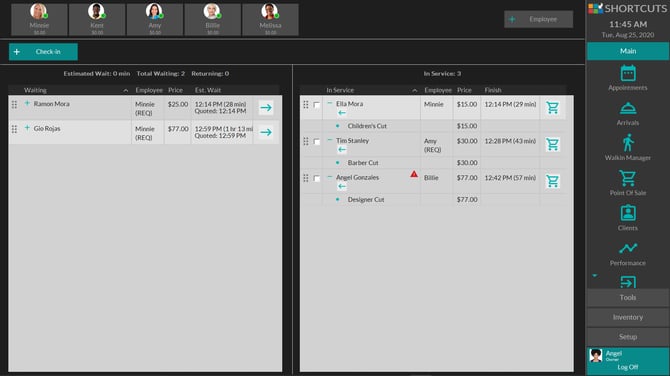
Employee List & Key Statistics
- The Employees and related functionality has been moved to the top of the screen, to be more consistent with the Appointment Book.
- Visibility of employee availability has been improved by displaying color coded status indicators against each employee:
-
 Grey = clocked off
-
 Green = clocked on
-
 Orange = away, or on a break
- Adding a guest into the Walkin Manager has been made more intuitive by relocating the button to the top left-hand side of the screen, highlighting it in a bold color and renaming it to “Check-in”.
- Key information relating to the Walkin Manager is now displayed across the screen just above the Waiting and In Service sections for ease of viewing. This includes: Estimated Wait, Total Waiting count, Retuning count and In Service count.
One-touch action buttons
Efficiency has been improved with new one-touch buttons located on each visit:
- Click the right arrow on a Waiting visit to move to In Service.
- Click the shopping cart on an In Service visit to check out the guest.
- Click the left arrow on an In Service visit to move back to Waiting.
Guest Wait and Service times
Visibility around service and wait times is now clearer with the introduction of:
- Quoted Start Time which is now displayed below the Estimated Start Time for waiting guests. This will allow the operator to manage guest expectations, with clear visibility of when the guest is expecting their service to begin.
- Estimated Finish Time which now displays both the time the service is due to finish and the amount of time remaining until the end of the service all in the one column.
- Current service status (e.g. In progress / Finished / Running over) which is now displayed clearly in text for In Service visits when visits are expanded to show service details.
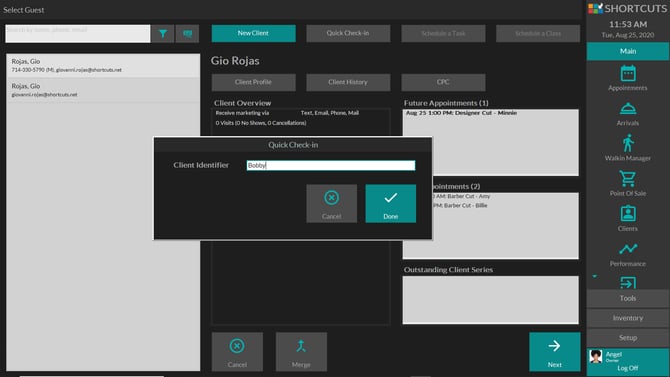
Checking in a quick/anonymous guest for a walkin visit
For businesses that use the “Predominantly collect” Client Data Focus setting, and have the “Disable Quick New” setting turned off:
Employees can now quickly check-in a guest who does not want their personal details stored on file by:
- Pressing the “Check-in” button in the Walkin Manager.
- Pressing the “Quick check-in” button at the top of the Client Search screen.
- Entering a nickname (Client Identifier) for the guest.
- Selecting the relevant service(s) and finalizing the visit as per usual.
For sites that use the “Predominantly do not collect” Client Data Focus setting:
The Client Identifier field is now a standard text entry field which only accepts Keyboard or Automatic number input.
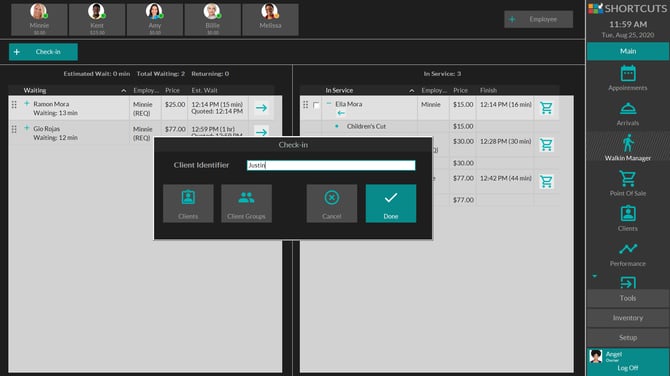
The nickname (Client Identifier) entered by the employee will be displayed in the following areas as “Walkin: [guest name]”, to help identify the guest:
- Point of Sale

- Transactions List

- Appointment Book

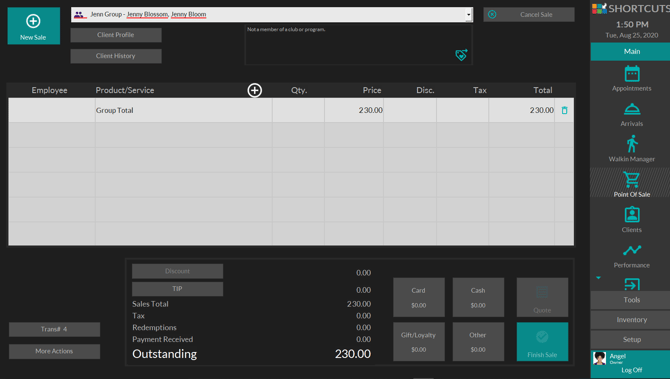
Walkin Manager simplified group checkout
To perform a group checkout for guests who have not already been grouped together:
The Walkin Manager now has a checkbox available on the left of each visit in the In Service section to allow for quick and easy group checkout.

- User checks the checkbox for the first group member
- User checks the checkbox for the second group member
- User clicks on the Checkout button for either one of the group members
- A group sale containing the 2 selected clients is created at POS, ready for checkout.

To perform a group checkout for guests who are already in a group:
Since these guests are already grouped, there is no need for the user to select them using the checkboxes before pressing the Checkout button.
- User clicks on the Checkout button for any one of the group members
- The user will then be prompted to choose whether they wish to check out the individual guest or the whole group. In this example, the guests want to pay together in the same transaction, so the user selects ‘Check Out Group’.
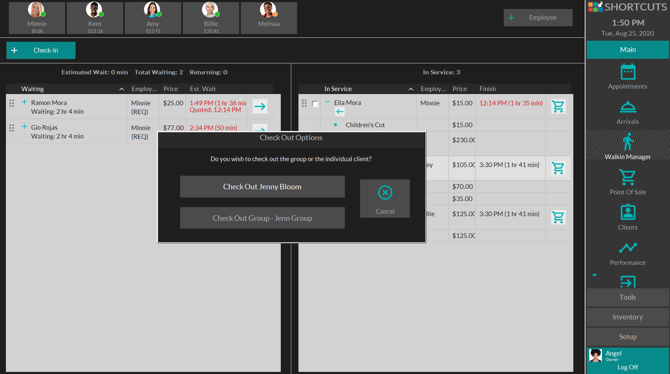
- A group sale is created at POS, ready for checkout.