Resource Management, Capabilities and Service Management
Streamlining Resource and Service Management for Business Success
1. Resource Categories
- Purpose: Tracks resource availability (e.g., rooms or equipment) to prevent scheduling conflicts.
- Setup Process:
- Access the "Configuration" menu.
- Expand "Services" and navigate to "Resource Categories."
- Right click in the Resource Category screen.
- Add a category, name it, and optionally provide a description.
- Configure if resource selection is mandatory during bookings.

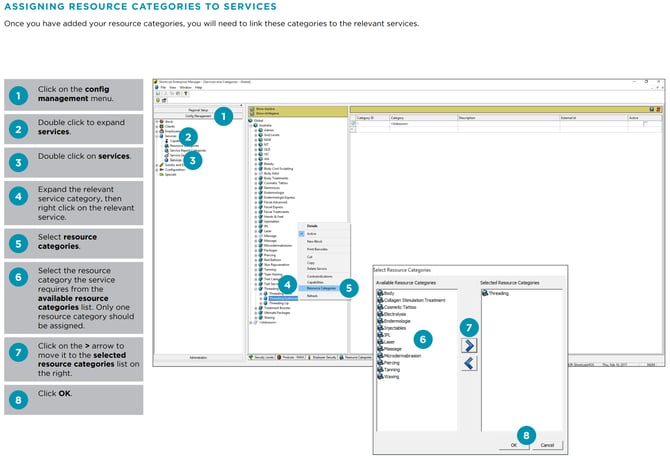
2. Assigning Resource Categories to Services
- Purpose: Links specific services to resource categories for seamless appointment scheduling.
- Steps:
- Navigate to "Services" under "Config Management."
- Right click on a service and select Resource Category.
- Assign the relevant resource category to the service.
- Save the changes.

3. Capabilities
- Purpose: Manages employee skills (e.g., waxing, cutting) to ensure services are assigned to qualified staff.
- Navigate to "Services" under "Config Management."
- Double click on "Capabilities".
- Right click on the Capabilities screen, and add "New Capability.
- Navigate to "Services" under "Config Management."
- Right click on a service and select "Capabilities.
- Assign the relevant Capability to the service.
- Repeat for all services and save the changes.
4. Series Management
- Adding a Series:
- Navigate to "Services" under "Config Management."
- Double click on your chosen service and navigate to the series tab in the heading menu.
- Name your series, add quantity, choose effective from date, price/discount and expiry.
- Save changes
- Deactivating a Series:
- Navigate to "Services" under "Config Management."
- Double click on your chosen service and navigate to the series tab in the heading menu.
- Remove the tick from the active box.
- Save changes


%20(1300%20x%20200%20px).png?width=450&height=69&name=Short%20Haircut%20Photo%20Banner%20Email%20Header%20(1300%20x%20300%20px)%20(1300%20x%20200%20px).png)

