
ℹ️ This feature is available in the Pro and Grow plan.
Learn how to process payments without an associated appointment for a walk-in - including taking split payments, applying discounts, change a team member associated with a product or service sale and more.
There are two ways to process a payment without an appointment:
- Process a walk-in sale: use a walk-in sale where you don’t need to capture customer details
- Create a customer sale: sell services and products attached to a new or existing customer
In this article, we’ll go over how to process a walk-in sale. For information on how to process a sale for a new or existing customer, see this article.
Access Point of Sale (POS)
- From the Menu, select POS.
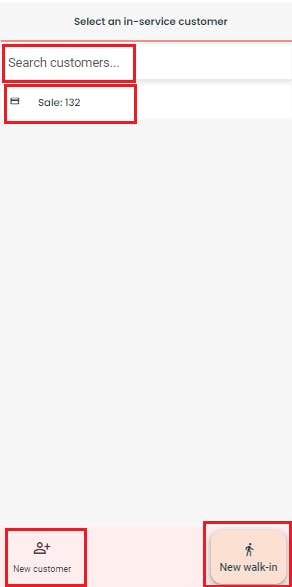
- You will be prompted to:
- Complete any listed unfinished transactions (e.g. Sale 132).
- Select a customer to create a sale for (or create a new customer).
- Create a new walk-in sale (no customer details required).
Process a walk-in sale
- Select "New Walk-in" located at the bottom right-hand side of the screen.

- The transaction will default to the next anonymous sale number
- (OPTIONAL) Rename the sale by clicking on the orange text.
Add the desired services and products to the sale
- Select whether to add a Service or Product to the transaction on the left hand side or if on mobile click on the “Add item” icon.

- Select the product or service category/line and specific service or product to add.
Review and adjust the items added to the sale
- Change the employee who provided the service or made the sale by selecting “(Unspecified)” or the employee name in orange.
- Change the price of a Product or Service by clicking on the price in red.
- Change the quantity of a Product or Service by clicking on the “x1” in red.
- Discount the price of a Product or Service by clicking on the price next to the downwards arrow in red.
- Discount the price of the entire sale by selecting the clicking on the price next to "Sale discounts".
- Change tax type by selecting the price next to GST.
- Remove an item from the sale by clicking on the rubbish bin icon.
- Delete the sale using the three dot menu and selecting "Delete sale".
Process tips
- You can add a tip to the transaction by selecting the "Add tip" button at the bottom of the screen.
- Enter the tip amount, then select "Apply".
Process payment
- Once you've added all the necessary items and made any adjustments, you're ready to process the payment.
- Click on "Payment" located at the bottom right-hand corner of the screen.

- Select the payment type.
- To take a split payment:
- Select the first payment method type and enter the amount being paid with that payment type. Then select "Apply".
- Select the second payment method type and confirm the amount being paid with that payment type. Then select "Apply".
- Continue the same process above with any additional payment methods.
- Confirm the payment amount is correct (”To pay” should be $0).
- Take the customer’s payment via your terminal, payment device, bank transfer or other method.
- Once the payment has been approved, press "End Sale" to finalise the transaction.
- You have the option to print a receipt or select "None" if the client doesn't need a receipt.
- A transaction complete screen will be displayed. Select “Finish” or select the “Shortcuts Aire” logo to return to the Appointment Book.

Other POS features
- Use the ellipsis menu to access more features in the POS including:
- Saved transactions: view incomplete transactions.
- Delete a sale.
- Change your actions mid-transaction: add a new customer, create a new sale, add a tip or add a new item from within the POS screen at any time before a transaction is complete.