
- From the menu, select Business Settings then Appointments setup.
- Click on the pencil icon to edit Appointments settings.

- An overview of the settings you can change:
- Booking interval: Set the default time interval for booking appointments. Choose from options like 15, 30, or 60 minutes to match your salon's scheduling needs.
- Default weeks in week view: Customise the number of weeks displayed in the week view of your appointment book. This setting helps in planning and visualizing your salon’s schedule over an extended period.
- Click the "Done" icon in the bottom right-hand corner to save your changes.
Configure Advanced settings
- Click on the pencil icon to edit Advanced settings.
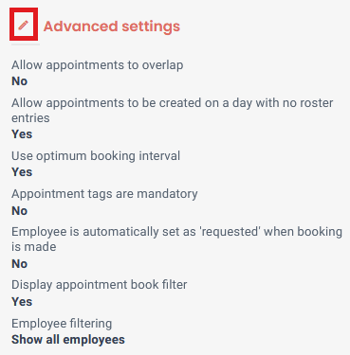
- An overview of the settings you can change:
-
Allow appointments to overlap: Enable or disable the ability to book overlapping appointments. Useful for handling quick consultations or services that can be performed simultaneously, enhancing booking flexibility.
- Allow appointments to be created on a day with no roster entries: Decide whether appointments can be booked on days when no employees are rostered. This feature is useful for managing exceptions and special bookings outside regular hours.
- Use optimum booking interval: Automatically suggest the best booking interval based on service duration and employee availability.
- Appointment tags are mandatory: Make it compulsory to tag appointments with specific labels such as service type or priority.
- Employee is automatically set as 'requested' when booking is made: Automatically mark the assigned employee as ‘requested’ for an appointment.
- Display Appointment Book filter: Choose to show the Filter function in the Appointment Book.
- Employee Filtering: Choose to "Show all employees", "Show rostered employees first" or "Show only rostered employees" in the Appointment Book view.
-
- Click the "Done" icon in the bottom right-hand corner to save your changes.